How to securely share secrets with podman containers
Podman is a daemon-less, open-source, Linux native tool designed to make it easy to find, run, build, share, and deploy applications. It offers many data isolation options, and in this post, I wanna cover all the options I know to securely share data with a container.
How to be paranoid about security
Any security measurement should always be based on a multi-layer security system, assuming that any protection can be compromised and another one should exist to block a potential attack. For example, if you want to design a distributed system, you probably want to follow a Zero Trust architecture:
 Kapil Raina -
This architecture assumes that any already authenticated and once secure entity can be compromised, so many boundaries and processes (framework) must exist to reauthenticate the entities and isolate them from other systems.
This architecture is designed for a system connected via a network, but we can apply the same logic to containers running inside the same OS/computer. By itself, Podman will already give you a lot of data protection out-of-the-box, setting up containers using the runc in daemon-less mode.
But there are many more ways to protect your applications, and in the following topics, we will discuss how to achieve the following architecture and why it's even too much for most scenarios. The goal is to show you how to create many security layers and why, then you can decide what's actually important for your application.
What this solution provides?
Process, network interfaces, and filesystem isolation from any other user in the system.
A container breach won't allow the attacker to access other users in the system.
1. Podman as a container runtime
The Linux Namespaces is a core portion of the Linux container runtimes. Podman takes advantage of most Namespace features respecting the limited user constraints. So, from a security point of view, you have the best you can get out of the box: your current limited user restriction plus the container isolation.
For comparison, the Docker project also offers a daemon-less option. But I don't have knowledge enough to evaluate how good or bad it is:
https://docs.docker.com/engine/security/rootless/
---
markmap:
  zoom: false
  pan: false
---

# systemd (pid 1/root)

## 1. limited user

### 2. podman isolation
- 3. nginx (root)
- 3. python main.py (root)

### firefox
### minecraft
### steam- Process isolation: All the processes you have under the limited user will be isolated from the
rootand any other user in the system, BUT the filesystem still is shared across all users, and you will rely on a Discretionary Access Control (DAC) usingchmodandchownto restrict access to any file in the system. That means, for example, thefirefoxprocess could potentially read misconfigured files in a volume that should be restricted only forrootaccess and this is BAD. Podman offers namespaces isolation to solve this problem and that's what we will see next. - Namespace isolation: When you create a new container, you will have a bubble inside the "Process isolation" bubble I mentioned before. Podman will create a namespace to isolate the process (again), the network interfaces, the domain name, and, more importantly now, the mount points; that means now you have a process that can't reach files outside their container unless you explicitly define the mount points to be shared with the container's mount point Namespace.
- Auto UID/GID mapping: Whenever you run a container as
rootuser (inside the container), podman will map to your current host's user who invoked the container. So, assuming your host user isuid=1000andgid=1000, if you run a podman container using therootuser, which will result into<host>uid=1000 == <container>uid=0and<host>gid=1000 == <container>gid=0.
This is a nice feature that allows you to transparently have therootcapabilities in the container to, for example, install packages, but the restriction to any file you may share with the container.
In summary:<host>current_user == <container>root
"With DAC, files and processes have owners. You can have the user own a file, a group own a file, or other, which can be anyone else. Users have the ability to change permissions on their own files." - What is SELinux / Red Hat
https://www.redhat.com/en/topics/linux/what-is-selinux
You can learn more about Linux Namespace on the Wikipedia article:
https://en.wikipedia.org/wiki/Linux_namespaces
Experiments
# Check your host `id`, `file stats`, and `network interfaces`
$ id
#> uid=1000(luiz) gid=1000(luiz) groups=1000(luiz),10(wheel), context=unconfined_u:unconfined_r:unconfined_t:s0-s0:c0.c1023
$ ls -lan
#> total 0
#> drwxr-xr-x.  3 1000 1000  60 Apr 11 20:43 .
#> drwxrwxrwt. 24    0    0 580 Apr 11 20:43 ..
#> drwxr-xr-x.  2 1000 1000  40 Apr 11 20:43 test
$ ip link show
#> 1: lo: <LOOPBACK,UP,LOWER_UP> mtu 65536 qdisc noqueue state UNKNOWN mode DEFAULT group default qlen 1000
#>     link/loopback 00:00:00:00:00:00 brd 00:00:00:00:00:00
#> 2: enp4s0: <BROADCAST,MULTICAST,UP,LOWER_UP> mtu 1500 qdisc mq state UP mode DEFAULT group default qlen 1000
#>     link/ether 01:23:45:67:89:ab brd ff:ff:ff:ff:ff:ff

# Create an alpine container
podman run -it --rm --user root docker.io/alpine sh

# Check the same data, but inside the container
$ id
#> uid=0(root) gid=0(root) groups=0(root),1(bin),2(daemon),3(sys),4(adm),6(disk),10(wheel),11(floppy),20(dialout),26(tape),27(video)
$ ls -lan
#> total 0
#> dr-xr-xr-x    1 0        0               20 Apr 11 23:47 .
#> dr-xr-xr-x    1 0        0               20 Apr 11 23:47 ..
#> drwxr-xr-x    1 0        0              862 Jan  9 12:46 bin
#> drwxr-xr-x    5 0        0              360 Apr 11 23:47 dev
#> [...]
$ ip link show
#> 1: lo: <LOOPBACK,UP,LOWER_UP> mtu 65536 qdisc noqueue state UNKNOWN qlen 1000
#>     link/loopback 00:00:00:00:00:00 brd 00:00:00:00:00:00
#> 2: tap0: <BROADCAST,UP,LOWER_UP> mtu 65520 qdisc fq_codel state UNKNOWN qlen 1000
#>     link/ether 6e:9d:fd:65:a5:5f brd ff:ff:ff:ff:ff:ff
# If you know about Linux namespaces, the `lsns` will
# tell you a lot about what's happening

# Run `lsns` in the host
$lsns -T
#> (a lot of namespaces)

# Create an alpine container
podman run -it --rm --user root docker.io/alpine sh

# Install the `lsns`
$ apk add util-linux-misc

# Check the container's namespaces
$ lsns -T
#> NS           TYPE   NPROCS PID USER COMMAND
#> 4026531834   time        2   1 root sh
#> 4026533899   user        2   1 root sh
#> ├─4026533206 net         2   1 root sh
#> ├─4026533982 mnt         2   1 root sh
#> ├─4026533984 uts         2   1 root sh
#> ├─4026533985 ipc         2   1 root sh
#> ├─4026533986 pid         2   1 root sh
#> └─4026533987 cgroup 2 1 root shWhat this solution provides?
- Process, network interfaces, and filesystem isolation from any other user in the system.
- A container breach won't allow the attacker to access other users in the system.
2. SELinux features
Podman has a close integration with SELinux for an additional security layer. Even if the DAC fails or is not enough to protect your files, SELinux labels can restrict access to the content from non-podman containers or even between podman containers, which is ideal.
Labeling systems like SELinux require that proper labels are placed on volume content mounted into a container. Without a label, the security system might prevent the processes running inside the container from using the content. By default, Podman does not change the labels set by the OS.
https://docs.podman.io/en/latest/markdown/podman-run.1.html
SELinux will check the inode's labels in order to restrict or allow a process to access it. You can use the stat command if you want to read the current labels:
If you need to learn more about Linux inodes, check those links:
https://www.redhat.com/sysadmin/inodes-linux-filesystem
https://www.youtube.com/watch?v=tMVj22EWg6A
# List secret files
$ ls -l

# Show the file stats
$ stat my-secret.txt
#>   File: my-secret.txt
#>   Size: 27        	Blocks: 8          IO Block: 4096   regular file
#> Device: 0,40	Inode: 215         Links: 1
#> Access: (0644/-rw-r--r--)  Uid: ( 1000/    luiz)   Gid: ( 1000/    luiz)
#> Context: unconfined_u:object_r:user_tmp_t:s0
#> Access: 2023-05-28 11:10:53.315612706 -0300
#> Modify: 2023-05-28 11:10:53.315612706 -0300
#> Change: 2023-05-28 11:10:53.315612706 -0300
#>  Birth: 2023-05-28 11:10:53.315612706 -0300
The value that matters to us right now is the Context: unconfined_u:object_r:user_tmp_t:s0. This value means that SELinux is not having any special behavior to protect our files beyond the defaults used by my Fedora Linux.
Podman has two special flags when you're mounting a volume that can be used to isolate the inodes with SELinux:
:z- Tells Podman to recursively add labels to the files to make them "shareable" across multiple Podman containers.:Z- Similar to the one above, but more secure. It enforces the ownership/access to the volume file to a single container, making them "unshareable".
Let's check the differences between those flags:
# Read the file labels
$ ls -Z my-secret.txt
#> unconfined_u:object_r:user_tmp_t:s0 my-secret.txt

# Mount the file using `:z` and exit the container
podman run --rm -v ./my-secret.txt:/my-secret.txt:z docker.io/fedora

# Read the file labels
$ ls -Z my-secret.txt
#> system_u:object_r:container_file_t:s0 my-secret.txt

# Mount the file using `:Z` and exit the container
podman run --rm -v ./my-secret.txt:/my-secret.txt:Z docker.io/fedora

# Read the file labels
$ ls -Z my-secret.txt
#> system_u:object_r:container_file_t:s0:c299,c547 my-secret.txt
As you can see in the example above, the labels contain additional values when using the :Z flag, in that case, the values :c299,c547. Those two values are two categories created by Podman on SELinux to restrict access to the volume files exclusively to the running container.
system_u: SELinux user.object_r: SELinux role.container_file_t: SELinux type.s0: SELinux level.c299,c547
You can learn more about Multi-Category Security here:
https://access.redhat.com/documentation/en-us/red_hat_enterprise_linux/8/html/using_selinux/assembly_using-multi-category-security-mcs-for-data-confidentiality_using-selinux
What this solution provides?
- Full volume isolation based on SELinux. So, even a compromised container will not allow an attacker to reach other container volumes.
3. Ephemeral volumes with tmpfs
Cool, now we know how to securely run an application inside a container and have our secrets isolated from each other. But... there's one more potential issue that can compromise your secrets: what if someone takes a snapshot of your system's disk?
A common strategy to deploy an application into a VM is storing secrets and certificates in plain text in some place in the file system and then mounting those files inside containers. This can be very secure for running applications as we saw above, but this is NOT secure when we think about someone compromising a VM backup, for example, since all the files are unencrypted in the file system.
There are many possible solutions for that, using the running hardware for the file decryption, like TPM/vTPM (Trusted Platform Module), special steps to unlock a software-based keyring solution, etc. Those are nice and secure ways to store encrypted data on disk but we have better solutions for that if we are using cloud providers.
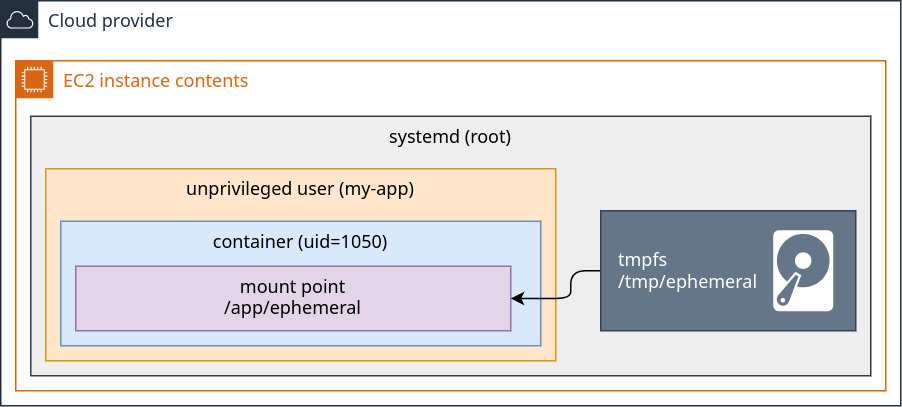
We usually think about the filesystem as not volatile storage, where the files will persist after a reboot, but it doesn't need to be this way. It's possible to write data into a volatile (not persistent) filesystem. We can use Secret Manager services from cloud providers to pull secrets and saves them into not persistent storage and this is the example I wanna show you now:
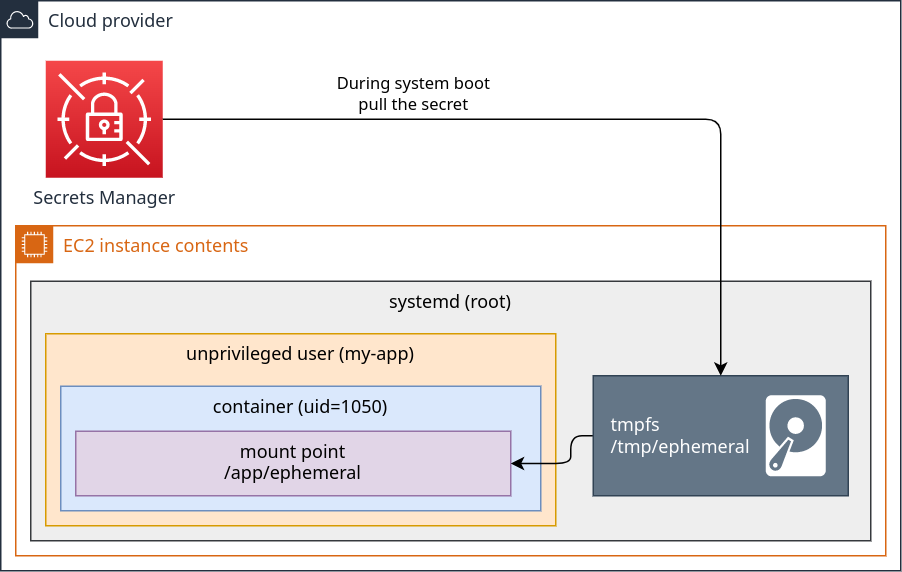
The steps to securely pull the secrets and share them with the containers are:
- Create a
tmpfsmount point. This type of file system stores all the files in the virtual memory. It's ⚠️ VERY IMPORTANT to set the confignoswapto prevent the memory pages from being transferred to the HDD/SSD, otherwise, all this effort is pointless. This option is only available on Linux Kernel 6.4 and above. If you have an older kernel, you probably need to use theramdiskinstead. - Pull the secrets using your cloud provider secrets manager and save them directly to the
tmpfsmount point. - Create the containers with the respective mount points.
- Now, whenever the system reboots, the data is lost.
Learn more abouttmpfson the Linux kernel docs:
https://www.kernel.org/doc/html/latest/filesystems/tmpfs.html
Learn more aboutramdiskon the Linux kernel docs:
https://www.kernel.org/doc/html/latest/admin-guide/blockdev/ramdisk.html
What this solution provides?
With this approach, secrets will never be saved on a persistent disk, so:
- The secrets can't be hacked/retrieved from disk snapshots.
- The secrets can't be obtained from most physical hacks since most methods require the machine to restart or extract the SSD/HDD.
Conclusion
There are many levels of security measures to apply in a container environment. Volume sharing is one of the most critical since it's the place where most sensitive data are stored.
In this post, you learned how to isolate the process, restrict the file system access between containers, and create ephemeral volumes. I hope all of this showed you new ways to protect the applications and environments you work on.
Additional notes
Podman's Secrets
Today is June 3, 2023, and Podman at this date doesn't have a solution to dynamically retrieve data from the cloud's secret managers but it has a way to save encrypted data in the host filesystem.
You can check at https://github.com/containers/common/tree/main/pkg/secrets the available secret drivers. The passdrive is an option that allows you to store encrypted data. The problem is: if you want to follow this approach, you will need to find a way to retrieve the passkey and store it in an ephemeral way, not too different from the approach described in this post.
Reference
- https://www.kernel.org/doc/html/latest/filesystems/tmpfs.html
- https://developers.redhat.com/blog/2018/02/22/container-terminology-practical-introduction#
- https://www.redhat.com/sysadmin/new-podman-secrets-command
- https://en.wikipedia.org/wiki/Linux_namespaces
- https://www.redhat.com/en/topics/linux/what-is-selinux
- https://opencontainers.org/
- https://docs.podman.io/en/latest/